In With the New Old-Fashioned Kitchen

IMAG0151
It really is beautiful. I had a steel fabricator replicate the legs the stove sits on and attach that as a pot rack to the ceiling. And then we made legs for the soapstone sink, too. I haven’t plumbed the sink yet – still working on steampunk plumbing.
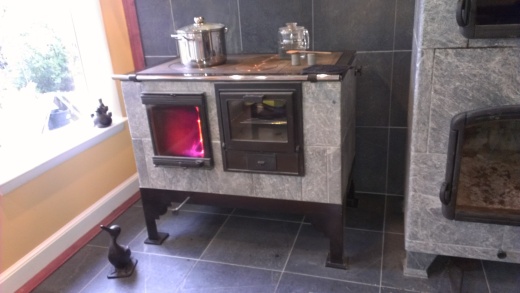
I’m enjoying learning to cook all over again – experimenting one ingredient at a time. I’ll put onions in the pizza oven and they come out roasted! Or a covered dish of rice in water in the stove’s little oven and it makes perfect rice! I made my morning oatmeal with dried cranberries in a pan in the pizza oven, then decided mornings would be so much better with apple crisp for breakfast!

IMAG0067-1
I’m developing a routine, learning how best to maintain this new system – even to the point of converting my garage to a woodshed – the best use of that space imaginable. My seasoned wood is mostly finely split and stacked in there, where I can conveniently grab an arm-full, and I have set up a spot for splitting the rest of the seasoned wood, stacked on the other side of the garage. It doesn’t take much effort; people go to the gym and work much harder than I do.

I’ll continue to post – I’ll make a page for recipes. Thank you for your kind interest in this project.
Kathryn

Posted in Uncategorized | 1 Comment

Building the Rest of the Chimney

The finished chimney

Now to catch up with the chimney construction – the last post, about the stove, showed how the stove was tied to the chimney, and this post will show how the heater was tied in.

Measuring that the flue from the heater will align with hole in wall, before the soapstone cladding is constructed.

On the other side of the wall from the heater is the bathroom, where the chimney will be a source of heat.

The flue from the heater to the chimney assembled before being carried up to the bathroom.

Cutting the fire stop flashing that will be installed when going through both the floor and ceiling.

Showing the terracotta pipe flue liners, the flashing that goes between layers of concrete block, and brickwork to grade.

The first course of cinderblock rising from the upper bathroom floor, over the fire stop flashing.

Scaffolding goes up as work shifts outdoors.

Hint; find tha Supah's shadow.

Where's tha Supah?

And Ray put those lights up on the ceiling to get them out of the way.

Breaking through the ceiling and roof.

A lot of bricks came up in buckets by means of a pulley. Ancient art of building a chimney.

In the meantime, indoors, Adam applies stucco to the chimney.

The flue from the heater is attached to the chimney. Note bracing by the wall.

Mmmmm, warm towels.

Final coat of stucco, flue damper installed, and the flue is just waiting for more bracing and boxing. And towel racks on the chimney.

And outside, a beautiful chimney with chimney pots.

A very elegant finish to a fantastic project. Adam Gauvin and Jeremy Brown, lead mason.

Posted in Uncategorized | Leave a comment

Building the Cook Stove, with Oven

Dry setting the soapstone

Dry setting the soapstone

Air Intake channels

Air Intake channels

First Courses of Fire Brick

First Courses of Fire Brick

Tha Supah wants to play

Tha Supah investigates the string from the crumb cake box.

Seating the flue damper assembly in line with the chimney

Seating the flue damper assembly in line with the chimney

Demonstrating the bypass flap

Demonstrating the bypass flap

Already a beautiful creation

Already a beautiful creation, with the water jacket and flue damper fitting perfectly

Where's tha Supah

New kitchen starting to take shape.

Applying Rope Gasket

Applying Rope Gasket

Gasket rope on stove, too

Rope Gasket on stove, too

Seating the oven

Seating the oven

Fine tuning the hardware

Fine tuning the hardware


Tha Supah investigates

The flue from the stove flue damper assembly to the chimney was very carefully done to insure it would never crack and leak exhaust. Angle irons and fiberglass-reinforced concrete made a stable platform for the steel pipe, then the pipe was wrapped in foil-backed mineral wool, and bricks were mortared around. Sheet metal was cut to enclose, and soapstone tile cut to finish.

Orange angle irons extending through wall into cinderblock chimney. View is from upstairs in the bathroom looking down through hole in floor. A board covers the two flues to keep out debris. The other flue is for the heater.


View from the back of the stove showing the flue damper assembly over the fiberglass reinforced concrete pad


Aiming to intersect with the terracotta chimney flue pipe.


View from the other side of the wall. The angle irons over and under the flue damper assembly are visible.

View of the clean-out on the other side of the chimney. Visible is one of the round holes cut into the terracotta chimney flue pipe; one hole to receive the pipe from the stove, and one hole on the opposite side to form the clean-out door. (A concrete plug will be made to shield the cast iron trap door.)


View from above up in the bathroom, looking down the terracotta chimney flue pipe to see Adam adjusting the metal flue pipe from the stove. Brick has been used to bring the chimney flush with the bathroom floor and fire blocking sheet metal flashing has been installed

The metal pipe from the masonry stove's flue damper assembly to the terracotta chimney flue pipe


View from the back of the masonry stove showing the flue pipe encased in foil-backed mineral wool and being encased in brick and mortar.

View from the side of the back of the masonry stove showing a sheet metal box screwed together and screwed to the angle iron, enclosing the pipe and mineral wool. Jeremy will cut a piece of soapstone tile to cover. Pipes are to the water jacket, which will be seen to later.

Posted in Uncategorized | Leave a comment

We Build the Masonry Heater and It Is Beautiful

The soapstone was quarried in Quebec, got cut and polished in Maine by the Maine Wood Heat Co, and then delivered along with fire brick. The trailer was left for a couple of days as each slab of stone and bundle of brick was hand carried and carefully stored inside the house.

Brock from Maine Wood Heat Co

Brock from Maine Wood Heat Co delivered the heater and stove material.

Shimming the Heater's footings

Shimming the Heater's footings

First course of inner core fire brick, with water jacket (to be developed later)

First course of inner core fire brick, with water jacket (to be developed later)

All the air flow apertures get cleaned of cement

All the air flow apertures get cleaned of cement

More cleaning. The work was impeccably done.

More cleaning. The work was impeccably done.

Forming the top of the fire box

Forming the top of the fire box

Earl Gray, tha supah, is supahvising

Earl Gray, tha supah, is supahvising

Building the floor of the oven

Building the floor of the oven

Setting the capstone for the oven

Setting the capstone for the oven

A couple of penultimate baffling layers with clean-out ports on the side

A couple of baffling layers with clean-out ports

Soapstone cladding going on

Soapstone cladding going on

Lifting rock slabs onto precisely set splines

Lifting rock slabs onto precisely set splines

Mechanical leverage for 200 lb slab of rock

Mechanical leverage for 200 lb slab of rock

Very tricky getting the top to seat on splines on all four sides

Very tricky getting the top to seat on splines on all four sides

Earl Gray, tha supah, continues to supahvise

Earl Gray, tha supah, continues to supahvise

Every join will be double sealed to be air tight

Every join will be double sealed to be air tight

Adam sets a spline in the back of the oven right on the edge of the opening to the hot air channel. Then he set the blocks of soapstone for the oven floor.
Setting a spline in the oven

Adam approves, as well as Earl Gray.

Adam approves, as well as Earl Gray.

Tha Supah is Awestruck

The guys took considerable time to make sure every join was perfect. This is a proud moment; they definitely created a magnificent heater. We can hardly imagine the storytelling, baking and eating, and just basking in the warmth that will be part of this creation. Good on ya, guys.

Adam Gauvin, honorary mason, and Jeremy Brown, lead mason

Adam Gauvin, honorary mason, and Jeremy Brown, lead mason

Posted in Uncategorized | Leave a comment

We Pour the Bridging Slab (Hearth) and Build the Cinderblock Wall

Ray , electrician, moving the electric cables from the wall, and installing new lights

Ray St. Pierre, electrician, moving the electric cables from the wall, and installing new lights

We didn’t have a concrete mixing truck for this pour; the masons mixed all the concrete by hand and carried buckets up to the kitchen. The concrete set up over the weekend.

Bridging Span (Hearth) poured

Bridging Span (Hearth) poured

Monday, they pulled out the wood framing, and built the concrete wall and started the chimney.

Stucco Basecoat plus diamond mesh

Stucco basecoat plus diamond mesh makes a sturdy foundation for tile installation


Durock, cement board plus steel studs over the basement stairs

Durock, cement board plus steel studs over the basement stairs, completes the cinderblock wall


Adam Gauvin and Jeremy Brown, lead mason, consult

Adam Gauvin and Jeremy Brown lead mason, consult


Starting the chimney

Starting the chimney


Showing the clean out door

Showing the flue clean out door


Building the two-flue chimney

Building the two-flue chimney; a separate flue for the heater and stove

Posted in Uncategorized | Leave a comment

Building the Bridging Slab (Hearth)

Structural Engineer 1
First, you shift the piping for the forced hot water system, which is being replaced, but is still necessary.

Colin and Dominic, brothers Pespisa, 3G plumbers carry on the family business


When I envisioned building the form for the bridging slab, I figured a piece of plywood would lie across the top of the piers, have sides, and be filled with rebar and concrete. But I couldn’t figure out how you would get the plywood out from under the slab. Well! Guess what! One builds several bottoms, between the piers, that can be pulled out in sections. I am impressed.
First, you frame each bottom section by dropping the frame the width of the plywood, so the whole bottom seems smooth and seamless, (and you could say you just put down a piece of plywood and easily got it out from under after the pour).
Framing each section between the piers
The bridging span extends over the end of the stairs to the basement and rather than have the access too restricted, we substituted lolly columns for one of the concrete block piers.
Jeremy Brown, mason and builder

Jeremy Brown, mason and builder


George Brown, carpenter and builder

George Brown, carpenter and builder


Moi doing the ties!

Tha Supah, Earl Gray, supahvises


The Building Inspector approves!

And tons of stuff gets delivered.
Graves Concrete

Graves Concrete

Posted in Uncategorized | Leave a comment

Building the Piers for the Heater/Stove Bridging Slab (Hearth)


Now that the basement floor is reinforced and can take the weight of thousands of pounds of rock without crumbling, Jeremy and Miguel start to build the supporting walls or piers that will support the hearth up in the kitchen. There will be two cement block walls and a row of lolly columns. The cement block walls have reinforcing rods and concrete in three of the open cells.
Jeremy and Miguel constructing the piers

Posted in Uncategorized | Tagged , , , | Leave a comment

Building the Footings for the Heater/Stove and Chimney


Robert Leet, the structural engineer from Whetstone Engineering, Wendell, MA, says, “Compact the soil!” So we compact the soil. But it’s really grim using a combustion machine in the house. We opened all the doors and windows we could and Jeremy ran the machine only if someone were around to pull him out, if necessary. Alarms did go off, so they work. And the weather was merely cold, not wicked cold.

“Build the forms and put down the rebar as per approved design.”
Forms and Rebar
The young man from Woburn Concrete was generous with his help and with three men working, the pour and clean-up was accomplished in under an hour.
Woburn Concrete
Woburn Concrete
Jeremy and Miguel screed the reinforced floor.

Miguel, Jeremy’s friend and fellow mason.
Miguel, fellow mason
The pour was completed Dec 23, 2011, right before the Christmas weekend. Everyone rested merry, and the concrete set up nicely.

Posted in Uncategorized | Leave a comment

In Which Wooden Structure is Removed, To Be Replaced with Masonry

Taping the cut-out and exposing the studs.


Basic safety and building code requires removing all flammable material from a certain area around any wood-burning site, whether fireplace, cast-iron stove, or masonry heater, and this area includes the floor under and the wall behind those things. Therefore, we have to cut out the heater’s/stove’s footprint from the floor and remove the studs from the wall behind. The footprint will get a poured concrete slab insert and the wall will become a masonry wall – in this case, cement block. (I decided against brick just to keep visuals to a minimum, and to make installing bathroom tile easier.) This masonry wall will have the positive value of transitioning from an uninsulated air gap splitting the split-cape house, to a warmth radiating core of the house.
Plumbing gets diverted with temporary PEX tubing and electric wires get cut out, and the chimney-surround gets framed.

Dominic Pespisa, third generation plumber and my kid's friend from school


Jeremy Brown, Hillcrest Masonry


George Brown, builder, carpenter, and Jeremy's dad

Posted in Uncategorized | Leave a comment

In Which Everything Goes Cold and Dark

This is the chapter in the story where everything goes cold and dark, there is great disruption and trepidation, there are delays and blockages thwarting a quick and easy journey, but each reverse makes us stronger; “it’s character-building.” I’m sure the journey is the point, but I don’t want to dwell on it either.

Er, why blog if not to dwell?
Even though the little Jodul I had stored in the garage will not be part of the kitchen configuration, it is now serving yeoman’s duty lifting everyone’s morale by providing heat, fried buttered bread and tea.
Jeremy lined the upper half of the chimney (from living level up) with a T-joint in order to accommodate this temporary location and a later installation in the basement, at which time, he will chop through the living room fireplace floor for a continuation of the same flue down to the basement. The T, however, has already come in handy as a remedy for a smoky start up = I can remove a cap on the downward pointing flue end, and, holding a burning piece of newspaper up the flue, jump start a recalcitrant draft.

Yeoman Jodul


Posted in Uncategorized | Leave a comment